Photography Rule of Thirds Examples: A Practical Guide for Photographers
The rule of thirds is one of the foundational concepts every photographer should understand and master. Whether you’re just starting out, pursuing photography as a hobby, or growing your professional business, knowing how to compose your images effectively can dramatically improve your work. Yet, many photographers struggle with applying this simple but powerful tool consistently. That’s where practical photography rule of thirds examples become invaluable.
At its core, the rule of thirds is about creating balanced and engaging compositions by dividing your frame into a grid of nine equal parts—three rows and three columns—and positioning key elements along those lines or their intersections. While this might sound straightforward, the real power comes from understanding how to use this grid creatively across different genres like portraits, landscapes, or product photography.
In this guide, we’ll explore the rule of thirds with practical examples, explaining how to use the rule of thirds grid effectively. We’ll break down how this technique benefits your images, provide hands-on advice to apply it immediately, and discuss how it fits into your overall photography workflow and business approach. By the end, you’ll be equipped to enhance your compositions and deliver stronger images that clients and audiences will love.
—
Key Takeaways
– The rule of thirds divides an image into a 3×3 grid, helping photographers create balanced, dynamic compositions by placing subjects along the grid lines or intersections.
– Applying the rule of thirds is flexible: it can be used in portraits, landscapes, still life, and action shots to guide the viewer’s eye effectively.
– Real-world examples, such as positioning a subject’s eyes on the top third line in portraits or aligning horizons along the lower third in landscapes, help illustrate practical use.
– The rule of thirds is a starting point, not a strict rule—knowing when and how to break it is just as important as applying it.
– Understanding and using the rule of thirds improves client satisfaction, marketing materials, and your portfolio, directly impacting your photography business.
– Combining the rule of thirds with other compositional tools and lighting techniques elevates your work and sets you apart in a competitive market.
– Regular practice and reviewing your images critically through the rule of thirds grid will develop your photographic eye and improve your editing workflow.
What Is the Rule of Thirds and Why Does It Matter?
The rule of thirds is a compositional guideline that breaks an image into nine equal parts using two equally spaced horizontal lines and two vertical lines. The intersections of these lines, often called power points, are where the human eye naturally gravitates. Placing important elements along these lines or intersections produces balanced, interesting images.
Why does this matter? Our eyes don’t naturally center objects when viewing photos; instead, they seek visual balance and natural flow. Using the rule of thirds ensures your images feel more dynamic and less static by encouraging asymmetry and movement within the frame.
For photographers, especially those working with clients, mastering this rule means producing images that are visually appealing without complicated setups. This helps build a consistent style and improves client feedback, which is essential for growing your business.
How to Use the Rule of Thirds Grid in Your Camera and Editing Software
Most modern cameras and smartphones offer an option to overlay a rule of thirds grid on your viewfinder or LCD screen. Activating this feature helps you compose shots in real-time by aligning subjects with grid lines. If your camera doesn’t have this option, imagine the grid or use external apps that help visualize it.
In post-processing, programs like Adobe Lightroom and Photoshop allow you to overlay a rule of thirds grid while cropping. Use this tool to adjust your framing after shooting, which can rescue an image that wasn’t perfectly composed initially.
Practical tip: When shooting, try to place your main subject, such as a person’s eyes or a building’s edge, exactly on one of the vertical or horizontal lines. In editing, crop to reinforce this alignment if needed. This simple habit trains your eye to naturally compose better images.
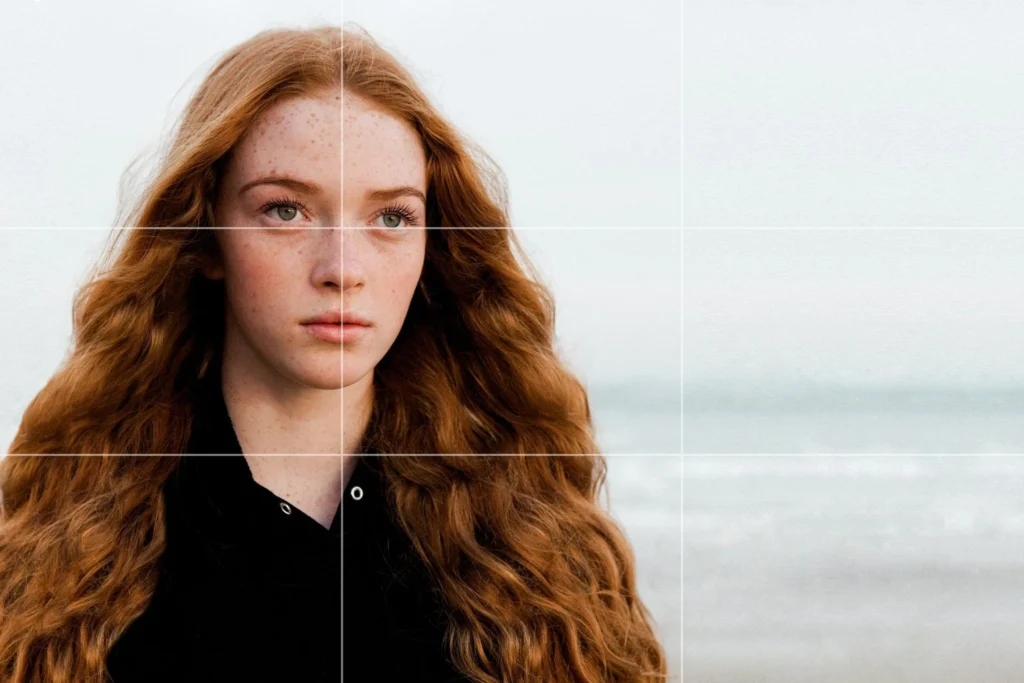
Photography Rule of Thirds Examples: Portraits That Stand Out
In portrait photography, the rule of thirds helps you avoid placing your subject dead center, which can feel static and less engaging. Instead, position the model’s eyes along the upper horizontal line. This placement creates a natural eye line that viewers are drawn to.
For example, in a head-and-shoulders portrait, position the eyes on the top third line and the face slightly off-center along one vertical line. This composition adds depth and interest, making the portrait feel more intimate and natural.
Mini case study: A wedding photographer often uses the rule of thirds to frame couples. By placing the bride’s eyes along the upper third and the groom’s body aligned with a vertical line, the images convey connection and balance, leading to more client satisfaction and referrals.
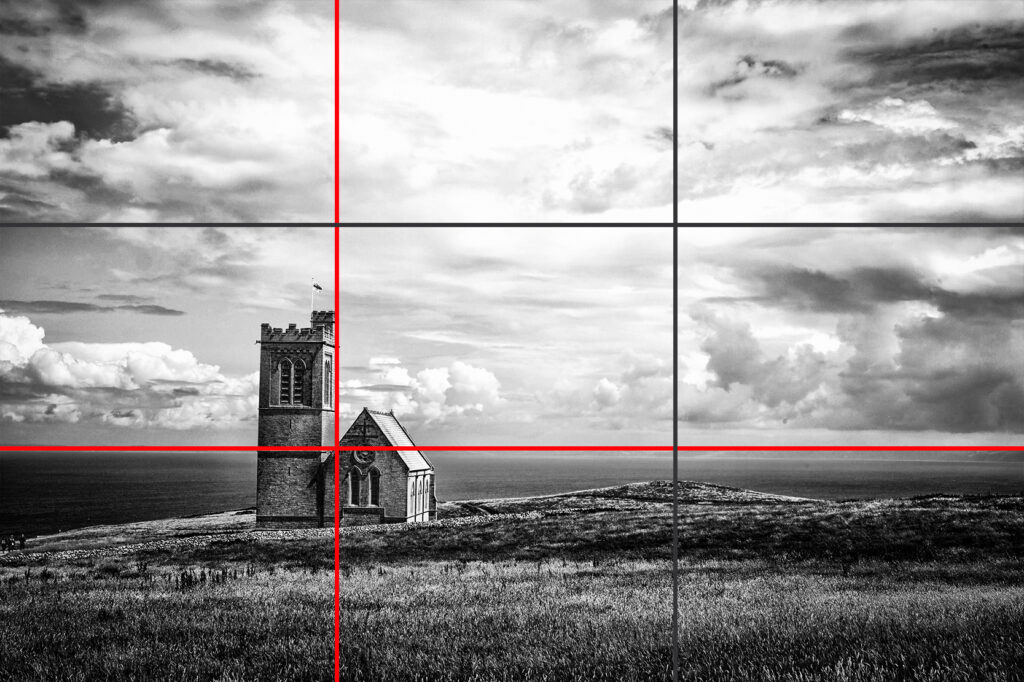
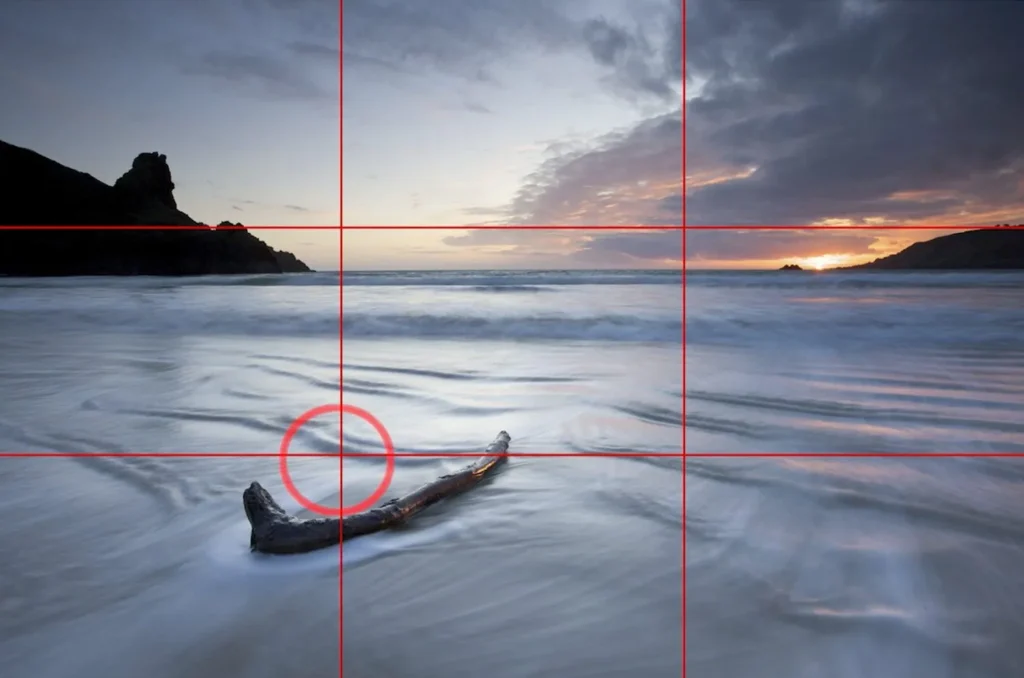
Rule of Thirds Landscape Examples: Creating Depth and Interest
Landscapes benefit immensely from the rule of thirds by guiding where to place horizons, focal points, or key elements like trees and mountains. The horizon line should typically fall along either the upper or lower third horizontal lines, depending on whether you want to emphasize the sky or the land.
For instance, if the sky is dramatic with interesting clouds, place the horizon on the lower third to showcase the sky. Conversely, if the foreground has compelling textures or elements, place the horizon along the upper third.
Additionally, place vertical elements like trees or buildings along the vertical third lines to anchor the composition and create depth.
Step-by-step:
1. Activate your camera’s grid display.
2. Identify your main focal element (horizon, tree, rock formation).
3. Align the horizon with the upper or lower horizontal third line.
4. Position vertical elements on one of the vertical third lines.
5. Take the shot and review for balance.
Using Rule of Thirds in Action and Event Photography
In fast-paced environments like events, it can be tempting to center everything for speed. However, consciously using the rule of thirds can elevate your candid shots and make them more engaging.
For example, when photographing a speaker on stage, place them along a vertical third line rather than dead center. This allows space in the composition for audience reactions or stage elements, giving context and storytelling power.
Similarly, in sports photography, position the athlete on one side of the frame, leaving space in the direction they are moving or looking. This technique enhances the feeling of motion and anticipation.
Actionable advice:
– Practice quick framing by mentally dividing your viewfinder into thirds.
– Use burst mode while composing with the rule of thirds in mind to capture decisive moments.
– Review your shots immediately to identify compositions that worked or need adjustment.
How the Rule of Thirds Improves Your Photography Business
Great composition isn’t just an artistic choice—it’s a client expectation. Photos that are well-composed using principles like the rule of thirds help you build a professional portfolio that attracts clients.
When clients see consistently balanced and engaging images, they are more likely to trust your skills and recommend you. Using the rule of thirds also simplifies shoots by providing a reliable compositional framework, so you spend less time guessing and more time creating.
Moreover, in marketing your business—whether on social media, your website, or printed materials—images composed with the rule of thirds stand out. They look polished and intentional, reinforcing your brand as a professional photographer.
Combining the Rule of Thirds with Lighting and Editing
While composition is vital, it’s only one part of a compelling photo. Pairing the rule of thirds with strong lighting techniques enhances the subject and mood. For example, in a portrait, position your subject off-center along the rule of thirds grid and use side lighting to create depth and dimension.
In editing, use cropping tools to enforce the rule of thirds grid, but also consider how contrast, color, and exposure guide the viewer’s eye. Adjusting these elements in post-production can complement your initial composition and elevate the image further.
Example workflow:
1. Compose with the rule of thirds at the shoot.
2. Use natural or artificial light to emphasize your subject’s placement.
3. Crop in Lightroom using the grid if needed.
4. Fine-tune exposure, contrast, and color to highlight the subject’s position.
5. Export and review for consistency across your portfolio.
When and How to Break the Rule of Thirds
Understanding the rule of thirds also means knowing when to break it. Some subjects benefit from centered compositions or intentional symmetry to convey stability or formality.
For example, minimalist portraits or architectural shots often work better with centered framing. The key is to understand why you’re breaking the rule and ensure it serves your creative purpose.
Guidelines for breaking the rule:
– Use centered composition for strong symmetry or reflection shots.
– Break the rule to create tension or highlight negative space intentionally.
– Always assess how the composition impacts the viewer’s emotional response.
—
Common Mistakes
Even experienced photographers slip up with the rule of thirds, especially when rushing or shooting under pressure. Here are some common mistakes and how to avoid them:
1. Over-relying on the rule without flexibility: Treating the rule of thirds like a rigid rule can stifle creativity. Remember it’s a guideline, not a law. Learn to recognize when centered or symmetrical compositions work better.
2. Ignoring the grid in-camera: Many photographers don’t use the grid overlay during shooting, making it harder to develop the habit of composing with thirds. Activate the grid on your camera or smartphone to train your eye.
3. Misplacing the main subject: Simply placing the subject on a line without considering balance or background clutter can create awkward compositions. Always check the entire frame for distractions.
4. Cropping too aggressively in post: Over-cropping to force the rule of thirds can degrade image quality or cut out important details. Aim to get your composition right in-camera first.
5. Neglecting other compositional elements: The rule of thirds is just one tool. Ignoring leading lines, framing, or light direction can make an image flat even if it follows the rule.
6. Failing to consider client or genre expectations: For example, some commercial clients prefer centered product shots. Always adapt your compositional choices to the project’s goals.
By being mindful of these pitfalls, you can use the rule of thirds more effectively and produce consistently stronger images.
—
What to Do Now
Ready to improve your compositions and grow your photography business with the rule of thirds? Here’s a straightforward action plan:
1. Activate Your Camera’s Grid: Turn on the rule of thirds grid in your camera or smartphone settings. This simple step makes it easier to compose shots correctly.
2. Practice Composing with the Grid: Spend a dedicated shooting session focusing solely on placing subjects along the grid lines and intersections. Experiment with different genres—portraits, landscapes, and candid shots.
3. Review and Analyze Your Work: After your shoot, review images using your editing software’s grid overlay. Identify which shots follow the rule well and which need improvement.
4. Experiment with Portrait and Landscape Examples: Try placing eyes on the upper third in portraits or horizons on the lower or upper third in landscapes. Use real-world scenarios like family photos or outdoor scenes.
5. Incorporate the Rule of Thirds into Your Workflow: Use it as a starting point during shoots and editing, but stay flexible. Combine it with lighting, color, and other compositional tools.
6. Seek Feedback: Share your images with a photography community or mentor and ask for critiques focused on composition.
7. Apply Lessons to Your Business: Use your improved images on your website, social media, and client galleries. Well-composed photos build credibility and attract clients.
8. Keep Learning: Explore other compositional techniques to complement the rule of thirds and continue evolving your style.
By taking these steps, you’ll develop a more confident eye, produce more compelling images, and strengthen your professional reputation.
—
FAQs
1. What is the rule of thirds in photography?
The rule of thirds is a compositional technique that divides the frame into nine equal parts with two horizontal and two vertical lines. Photographers place key elements along these lines or their intersections to create balanced, eye-pleasing images. It helps move subjects off-center to avoid static compositions and guide the viewer’s attention naturally.
2. How do I apply the rule of thirds in portrait photography?
In portraits, position your subject’s eyes along the upper horizontal third line, usually on one of the vertical lines as well. This placement creates natural eye contact and makes the image more engaging. Avoid centering the subject’s face, which can feel less dynamic. Use your camera’s grid overlay to help compose in real-time.
3. Can I use the rule of thirds for landscape photography?
Absolutely. In landscapes, the rule of thirds helps you decide where to place the horizon—either on the upper or lower horizontal third—depending on whether the sky or foreground is more interesting. Vertical features like trees or buildings can be aligned with vertical third lines to add depth and balance.
4. When should I break the rule of thirds?
Breaking the rule of thirds can be effective when you want to emphasize symmetry, stability, or minimalism. For example, centered compositions work well for reflections, architectural shots, or formal portraits. The key is to break the rule intentionally and understand the effect it creates.
5. How does mastering the rule of thirds help my photography business?
Mastering the rule of thirds leads to consistently well-composed images that clients find visually appealing. This builds trust, improves your portfolio quality, and enhances your marketing materials. Better images translate to happier clients, more referrals, and ultimately business growth.
—
Conclusion
Understanding and applying photography rule of thirds examples is a fundamental skill that can elevate your images and your photography business. This compositional guideline is more than just a technical tip—it’s a creative tool that helps you tell stories, engage viewers, and deliver polished results your clients will appreciate.
By consistently using the rule of thirds grid during shoots and in post-processing, you develop a stronger photographic eye, improve your editing workflow, and create images that stand out in a crowded market. Whether you’re working on portraits, landscapes, or dynamic event shots, this technique offers a flexible framework to build balanced and compelling compositions.
Remember, the rule of thirds is a starting point, not a strict rule. Knowing when to apply it and when to break it thoughtfully allows you to create unique images with purpose and professionalism.
Start activating your camera’s grid today, practice with real-world examples, and analyze your progress. With time and intention, you’ll find your compositions becoming more natural and impactful—helping you grow your skills and your photography business.
Embrace the rule of thirds as part of your photographic toolkit, and watch how it transforms your images from ordinary to extraordinary.