Night Photography Tips for Beginners
Night photography offers a unique window into the world after dark—a time when cityscapes glow with artificial lights, stars sparkle in the sky, and scenes transform into dramatic compositions. For beginner photographers, venturing into night photography can feel intimidating. The technical challenges of low light, longer exposures, and managing camera settings can quickly overwhelm. Yet, with the right night photography tips, understanding basic long exposure photography principles, and mastering night photo settings, you can create captivating images that stand out.
This article will guide you through practical, hands-on advice tailored specifically for beginners stepping into night photography. Whether you’re shooting urban street scenes, starry skies, or creative light trails, these tips will build your confidence and improve your results. Beyond camera settings, we’ll also cover essential gear, composition strategies, and post-processing workflows that turn good night photos into great ones.
Importantly, this guide focuses on realistic, actionable steps you can implement right away, helping you avoid common pitfalls and develop a professional approach to shooting in low light. Night photography is not only a creative challenge—it can also enhance your photography business by expanding your portfolio and attracting clients looking for unique images.
By the end of this article, you’ll have a clear understanding of how to prepare for a night shoot, adjust your camera settings for optimal exposure, and use long exposure techniques effectively. Let’s dive into the world of night photography with practical tips that will sharpen your skills and inspire your creativity.
Key Takeaways
– Night photography requires mastering manual control of your camera settings, including aperture, shutter speed, and ISO, to handle low light conditions effectively.
– Long exposure photography is a fundamental technique in night photography, allowing you to capture light trails, smooth water, and star movement by using slow shutter speeds.
– Essential gear includes a sturdy tripod, remote shutter release or timer, and wide-aperture lenses to stabilize your camera and reduce noise.
– Composition at night involves looking for strong light sources, reflections, silhouettes, and contrasts—elements that create drama and depth in your photos.
– Post-processing plays a critical role in night photography for noise reduction, enhancing shadows and highlights, and fine-tuning color balance.
– Avoid common mistakes such as using high ISO without stabilization, neglecting focus in low light, and ignoring white balance adjustments.
– Consistent practice and reviewing your images on a large screen help you learn from each shoot and improve your night photography skills over time.
What Are the Best Night Photo Settings for Beginners?
One of the biggest hurdles for beginners is understanding the best night photo settings to use. Since light is limited at night, your camera needs to compensate to capture enough light without introducing too much noise or blur.
Aperture:
Use a wide aperture (small f-number like f/2.8 or f/4) to allow more light to reach the sensor. This helps keep shutter speeds faster and reduces noise. However, be mindful of your depth of field; wider apertures produce shallower focus, so plan your composition accordingly.
Shutter Speed:
Slow shutter speeds are the backbone of night photography. Start with exposures around 10 to 30 seconds, depending on available light. Long exposures allow your camera to gather light over time, which is essential for capturing details in dark scenes and creative effects like light trails or star movement.
ISO:
Keep ISO as low as possible (ISO 100-400) to minimize noise. Higher ISO can brighten your image but often results in grainy photos, especially on entry-level cameras. If you need more brightness, increase shutter speed or aperture first before raising ISO.
Focus Mode:
Use manual focus or single-point autofocus on a bright area or distant light. Autofocus often struggles in the dark, so manual focus ensures sharp images. Use your camera’s live view zoom feature to fine-tune focus if available.
White Balance:
Set your white balance manually or use the “Tungsten” or “Incandescent” preset to correct the yellow-orange cast of streetlights. Shooting in RAW format allows you to adjust white balance more precisely during editing.
Example Scenario:
Imagine photographing a city skyline at night. Set your lens aperture to f/4, shutter speed to 20 seconds, and ISO 100. Mount your camera on a tripod to avoid shake. Use manual focus on a bright building window, and set white balance to tungsten. This setup will capture crisp, colorful lights without excessive noise.
How to Use Long Exposure Photography for Stunning Night Shots
Long exposure photography is a powerful technique that involves using slow shutter speeds to capture movement and light over time. It’s fundamental in night photography for creating dramatic effects.
Step-by-Step Guide for Long Exposure Night Shots:
1. Set Up Your Tripod: Stability is crucial for exposures longer than a second. Use a sturdy tripod to prevent any camera shake.
2. Choose a Remote Shutter Release or Timer: Pressing the shutter button can cause blur. Use a remote release or set a 2-second timer to eliminate this.
3. Select Your Exposure Settings: Begin with an aperture of f/4 to f/5.6, ISO 100, and shutter speed of 15 to 30 seconds.
4. Compose Your Shot: Look for elements like moving cars for light trails, water for smooth reflections, or stars for star trails.
5. Take a Test Shot: Review the exposure and focus. Adjust shutter speed longer if the image is too dark, or reduce if overexposed.
6. Experiment With Movement: For creative effects, move the camera slightly during exposure or include moving subjects.
Practical Example:
Capture a busy street at night. Set your camera for a 20-second exposure. Cars passing by will create colorful light trails, while stationary buildings stay sharp. This technique adds dynamic energy to your photo and highlights the contrast between motion and stillness.
Essential Gear for Night Photography Success
Having the right gear can make night photography much easier and improve your results significantly.
Tripod:
A solid tripod is non-negotiable. It stabilizes your camera during long exposures, preventing blur from hand shake. Choose one that is sturdy yet portable for outdoor shoots.
Remote Shutter Release or Intervalometer:
These tools let you trigger your shutter without touching the camera, reducing shake. Many cameras have built-in timers as a free alternative.
Wide Aperture Lenses:
Lenses with large maximum apertures (f/1.8, f/2.8) gather more light, making focusing and exposure easier in dark conditions.
Flashlight or Headlamp:
Useful for composing shots in the dark and adjusting camera settings. Use red light mode if available to preserve night vision.
Extra Batteries and Memory Cards:
Long exposures and cold night conditions drain batteries faster. Always carry spares.
Example:
When shooting stars or northern lights, a camera mounted on a tripod with a 24mm f/1.8 lens and a remote shutter release will allow you to capture sharp, noise-free images with ease.
How to Compose Compelling Night Photos: Tips and Techniques
Composition is key to turning technical night photos into visually compelling images.
Look for Strong Light Sources:
Street lamps, neon signs, car headlights, and illuminated buildings provide focal points and contrast.
Use Leading Lines:
Roads, bridges, and light trails guide the viewer’s eye through the frame. Position yourself to capture these lines dynamically.
Incorporate Reflections:
Wet streets, puddles, or bodies of water add reflections that double the light and create symmetry.
Silhouettes and Shadows:
Use backlighting to create mysterious silhouettes or dramatic shadows that add depth.
Frame Your Subject:
Use natural frames like archways, windows, or tree branches to focus attention.
Practical Example:
Photograph an empty street after rain. Use reflections in puddles to capture neon signs and streetlights. Compose so the road leads from the foreground into the distance, creating depth. This approach turns a simple scene into a captivating image.
How to Focus Accurately in Low Light Conditions
Focusing at night can be challenging because cameras struggle to lock onto subjects in low light.
Switch to Manual Focus:
Autofocus systems may hunt or fail in darkness. Use live view with zoom to manually adjust focus on bright spots or edges.
Use a Bright Light Source:
Aim at a streetlight or illuminated sign to focus, then recompose your shot.
Focus Peaking:
If your camera has focus peaking (highlighting in-focus areas), use it to ensure sharpness.
Pre-Focus:
During twilight or when there’s more light, pre-focus your lens on a subject and switch to manual focus to lock it.
Example:
When photographing star trails, focus on a bright star or distant light using live view zoom. Once focused, set your lens to manual to prevent focus shift during the long exposure.
Post-Processing Tips for Night Photography
Post-processing is essential to bring out the best in your night photos.
Shoot in RAW:
RAW files retain more detail and allow greater adjustment of exposure, white balance, and noise reduction.
Noise Reduction:
Use noise reduction tools carefully to smooth out grain without losing sharpness.
Adjust Exposure and Contrast:
Increase shadows and highlights to enhance details hidden in dark areas.
White Balance Correction:
Fine-tune to remove color casts caused by artificial lights.
Use Clarity and Dehaze:
These adjustments can add depth and reduce atmospheric haze common in night shots.
Crop and Straighten:
Night photos often benefit from cropping to improve composition and correcting horizon lines.
Practical Workflow:
Import your RAW file into Lightroom or similar software. Start by adjusting white balance, exposure, and contrast. Next, apply noise reduction and sharpen the image. Finally, crop and export for sharing or printing.
How to Incorporate Night Photography into Your Business
Night photography can be a lucrative niche for your photography business if you approach it strategically.
Offer Unique Services:
Cityscape prints, night event coverage, or creative light trail portraits can differentiate your portfolio.
Build a Portfolio:
Showcase your best night shots on your website and social media to attract clients interested in nighttime imagery.
Use Night Shoots for Branding:
Night photos with dramatic lighting and mood can elevate your brand’s visual identity.
Plan for Client Safety and Accessibility:
When scheduling night shoots with clients, select safe locations and communicate clearly about timing and expectations.
Pricing Considerations:
Night shoots may require extra time for setup and post-processing; factor this into your pricing.
Example:
A wedding photographer can offer evening portraits using city lights as a backdrop, providing clients with unique images that stand out from typical daytime shots.
Common Mistakes
When starting with night photography, beginners often make mistakes that hinder their results. Recognizing these pitfalls early will save frustration and improve your images.
1. Forgetting a Tripod:
Hand-holding a camera for long exposures causes blur. Always use a tripod for stability.
2. Using High ISO as a First Resort:
Raising ISO increases noise. Instead, prioritize aperture and shutter speed adjustments first.
3. Poor Focus:
Relying solely on autofocus in the dark often results in soft images. Use manual focus and focus peaking.
4. Neglecting White Balance:
Wrong white balance leads to unnatural colors. Shoot in RAW and adjust white balance during processing.
5. Ignoring Composition:
Good technical settings alone don’t make great photos. Plan your composition to create visually engaging images.
6. Not Using a Remote Shutter or Timer:
Pressing the shutter button can cause camera shake. Use a remote release or timer.
7. Overlooking Weather and Safety:
Shooting at night poses safety risks. Scout locations during the day, wear reflective clothing, and bring a friend if possible.
8. Skipping Test Shots:
Failing to review images on location prevents you from catching exposure or focus errors early.
9. Not Practicing Enough:
Night photography requires patience and experimentation. Don’t get discouraged by initial failures.
By avoiding these common mistakes, your night photography journey will be smoother and more productive.
What to Do Now
Ready to take your night photography skills to the next level? Here’s a practical action plan to get started immediately:
1. Gather Your Gear:
Ensure you have a tripod, remote shutter release (or use your camera’s timer), a lens with a wide aperture, and spare batteries.
2. Learn Your Camera’s Manual Settings:
Practice setting aperture, shutter speed, and ISO manually during the day to build muscle memory for night shoots.
3. Scout Local Night Locations:
Visit urban areas, parks, or waterfronts after sunset to identify interesting subjects and compositions.
4. Start with Simple Shots:
Try shooting light trails from moving cars or illuminated buildings. Use shutter speeds between 10-30 seconds and ISO 100-200.
5. Experiment With Focus:
Practice manual focusing using your camera’s live view zoom on streetlights or bright objects.
6. Shoot in RAW:
Always shoot RAW to give yourself maximum flexibility in post-processing.
7. Review and Edit:
After each shoot, review your images on a computer, note what worked and what didn’t, and edit your photos to enhance their impact.
8. Join a Photography Community:
Share your night photos for feedback and learn from others’ experiences.
9. Plan a Night Photography Project:
Set a goal such as capturing 10 unique night scenes over a month to maintain motivation and develop your style.
By following this step-by-step plan, you will build confidence and technical skill in night photography. Remember, consistent practice and thoughtful review are key to improvement.
FAQs
Q1: What is the best camera for night photography beginners?
For beginners, a camera with good low-light performance, manual controls, and the ability to shoot in RAW is ideal. Mirrorless cameras or DSLRs with APS-C or full-frame sensors work well. Look for models with wide ISO ranges and articulating screens for easier composition. Entry-level cameras like the Canon EOS Rebel series or Sony Alpha a6000 offer excellent value and night photography capabilities.
Q2: How do I avoid noise in night photos?
Noise is primarily caused by high ISO settings in low light. To minimize noise, use the lowest ISO possible and compensate with longer shutter speeds and wider apertures. Shooting in RAW allows you to apply noise reduction during editing without losing detail. Investing in a camera with good high ISO performance and using noise reduction software can also help.
Q3: Can I do night photography without a tripod?
While possible, hand-holding a camera at night is challenging due to slow shutter speeds causing blur. Using a tripod is highly recommended for sharp images. If you don’t have a tripod, try stabilizing your camera on a steady surface, increase ISO to shorten shutter speed, or use lenses with image stabilization, but these are compromises and won’t match the stability of a tripod.
Q4: What settings should I use for star photography?
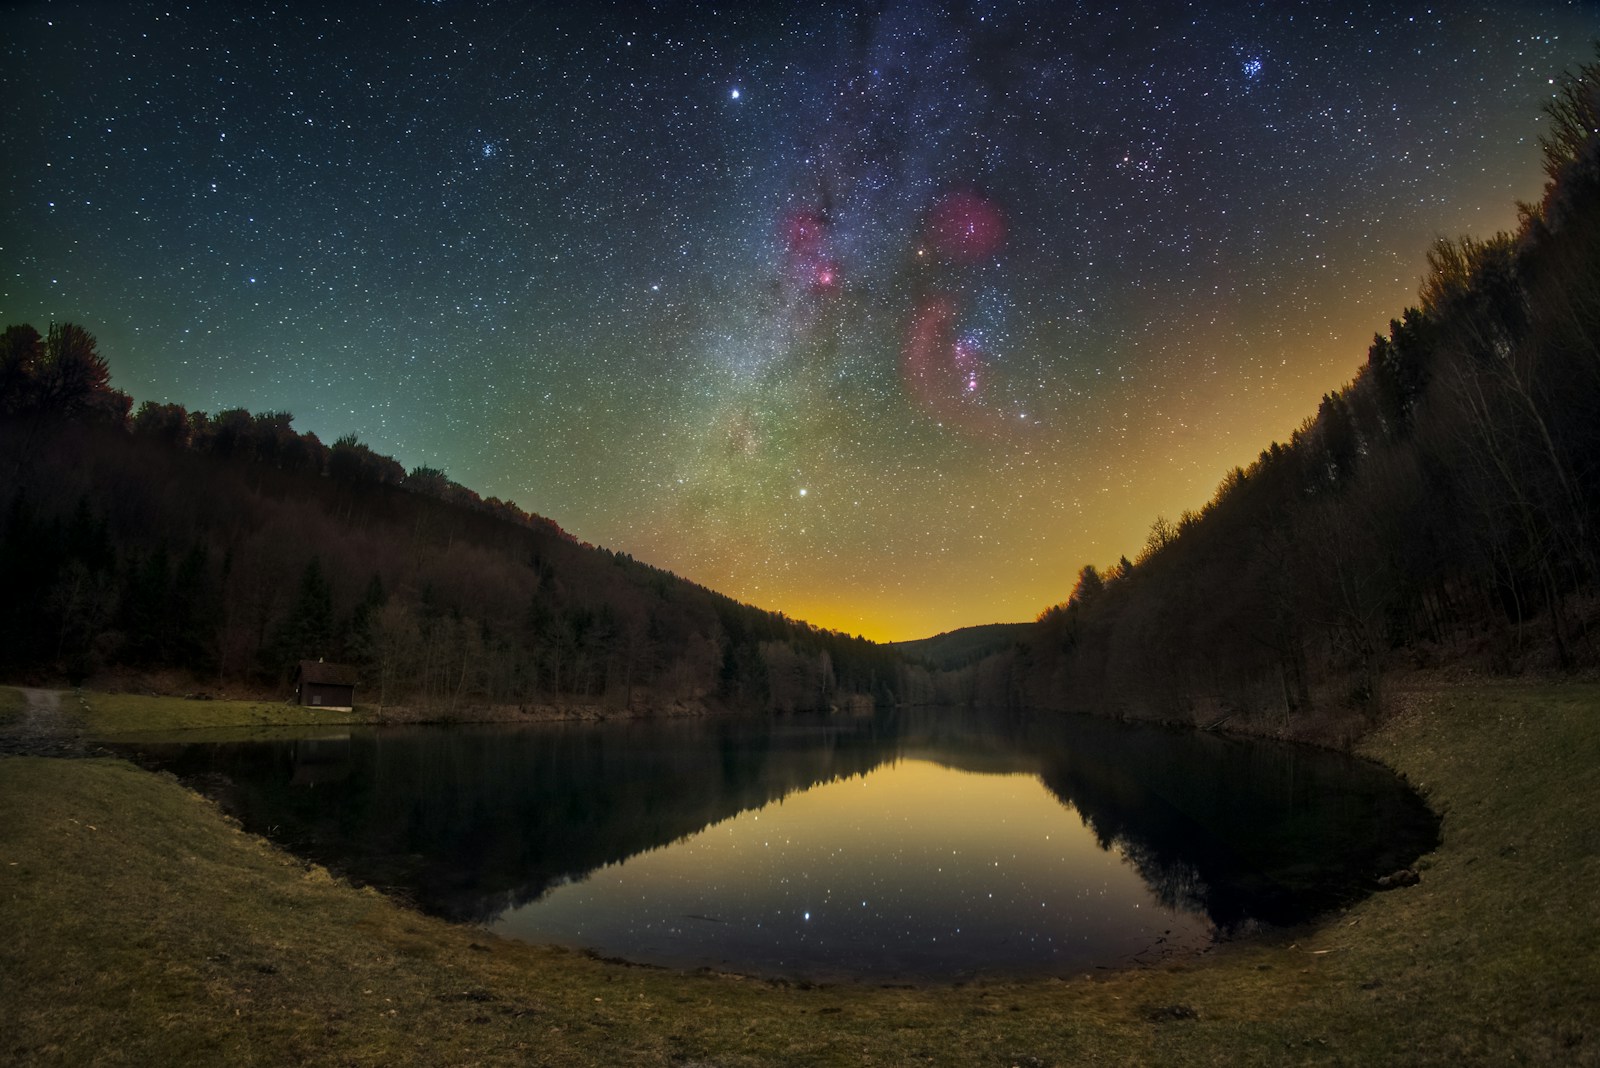
For star photography, start with a wide-angle lens at its widest aperture (f/2.8 or lower), ISO between 1600-3200, and shutter speed around 15-25 seconds to avoid star trails. Use manual focus set to infinity, and shoot in RAW. Adjust settings based on your camera’s noise performance and the brightness of the stars.
Q5: How do I focus in complete darkness?
In complete darkness, autofocus often fails. Use manual focus with live view, zooming in on a bright distant light or star. If no light source is available, pre-focus during twilight or use a flashlight to illuminate your subject temporarily. Lock your focus manually before shooting.
Conclusion
Mastering night photography is a rewarding challenge that opens up new creative possibilities for beginner photographers. By understanding and applying these night photography tips—such as optimizing night photo settings, mastering long exposure techniques, and using the right gear—you can consistently capture stunning images after dark. Night photography demands patience, preparation, and experimentation, but the results are well worth it.
Incorporating night photography into your skill set also adds value to your photography business by diversifying your portfolio and offering unique services that clients appreciate. Whether you’re capturing vibrant cityscapes, celestial stars, or moody light trails, the principles covered here will help you shoot confidently and professionally.
Remember to avoid common mistakes like neglecting a tripod or relying too heavily on high ISO, and always review your images critically to learn and improve. With consistent practice, thoughtful composition, and effective post-processing, night photography can become one of your most exciting and profitable photography niches.
Take your camera out after dark, experiment with these tips, and watch your night photography transform from intimidating to inspiring. The night is yours to capture—one frame at a time.